Saturday, March 26, 2011

Spring...and bada-bing!

We recently just found out that we got accepted to Spring Bada-Bing this April!  We've done this show three of the past four years and love it.  Not only is it a great and well put together show, but it always gives us an excuse for a little spring trip!

Some of our favorite places to go are here and here and here and to stay is here.

We've been busy working on some new items for the show.  Can't wait to see the official list of vendors for this year's show.  If you're around Richmond, the show is Sun April 17th from 11am-5pm!  


Friday, March 25, 2011

New Shower Part II...The Finale


If you've ever tiled before, then you've probably have grouted (or at least should have).  Our night of grouting fell on a Wednesday evening (Day 4 of the Renovation) beginning at 7:30pm.  We knew that this step may take a little time.  
If you've never been acquainted with process, essentially you mix up the grout and using the grout float, spread the sandy mixture into the spaces between the tiles.  You leave this set for a few minutes and then the fun begins.  The grout leaves behind a white film that you need to wipe off with a clean, damp sponge.  You keep doing this until the white film stops reappearing.  

We figured on maybe needing to wipe over the area three times.  Foolish thinking?  Yes, most definitely.  I honestly don't know how many times we wiped the tile, but I do know we started around 8:30pm and ended finally just before midnight.  Yes, midnight.  Almost three and a half hours of this.  

I don't know why exactly it took this long or even if this is normal, but I do know this:  If you're grouting, after wiping the tiles a few times with the sponge, use an old T-shirt and rub over the tiles.  The white film fades away and you aren't a slave to the shower for the entire night.   

So after we successfully got the film off, it was time to wait for 48 hours to seal the shower.  We sealed after work on Day 6 and this was by far one of the most simplest tasks.  Just brush the sealer over and wipe off the excess. 
 Great!  Done!  After waiting another 24 hours, we could finally shower (at home)!  (Please note-we were showering during this time!)
Welcome to Day 7.  The expectant finish the shower day (well, night that is).  We were all set and ready to go when we realized.....the shower handle valve and diverter pipe were too short.  And the lower faucet pipe was too long.  By a lot.  This was going to need replaced before we could hook the fixtures up.  Obviously, this was not going to be as easy as we thought.  


 Luckily, Kinsey's uncle knows about plumbing and pipes.  Unfortunately, he was out of town until Tuesday.  
Day 10- Kinsey's uncle comes and replaces our lower faucet pipe and attaches the fixture.  He also uses his mighty tools to pry off the old shower handle valve setting that wouldn't budge for us.  At this point we were getting pretty excited and felt the end was in sight.

I'll spare all the minor details of "why doesn't this pipe fit?", "the pipe isn't long enough", "do we need a plumber" "various trips to local home improvement stores and plumbing specialist" scenarios we encountered in the last few days.
Let's just say we were beyond thrilled when we had attached the new fixtures and turned the water back on for a test run.

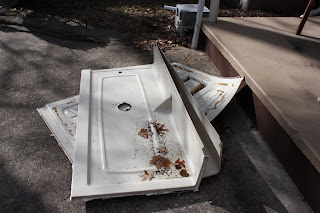
This was all that remaining of our old shower. 

And the finished product: 

 We picked up a new shower curtain, hooks, rug, and various other accessories at Target.
I love our new shower head.
We didn't raise the plumbing at all in the shower, but the new head is probably a good 18 inches or so higher than the old one.  The old head was just a stationary one that sloped down sharply.  The new hand held one is high enough that I almost think it's like this one that I've always wanted.

These shower hooks were purchased as well.  I love the little glass ball on the end of the hook.  Our old shower hooks were the circle kind that snapped closed.  It was always a hassle to un click each one and then re click each one to change the curtain.  Does this sound lazy?  Probably.  Does it look a whole lot better? Yes.

And another shot of the shower curtain because I love it so:

Shower all done, now it's time to move on to the sink/vanity and the floor.

Tuesday, March 22, 2011

New Shower...Part I


After just under 2 weeks (13 and half days to be exact), our new shower is finished!  


We barely recognize it!  Gone is the plastic shower surround.  Gone is the mildew.  Gone is the leaky shower fixtures.  We chose a warm beige/brown porcelain tile called piedmont noce from Lowes.

The plastic surround came off surprising easy.  It was never really properly installed in the first place and you could feel the sides weren't firmly attached to the wall.  We scored the edges and pried the three sections off the wall.  


Next, was the task of breaking through the drywall.  We enlisted a small team to help with this phase of the demo and was finished quite quickly.  

After the drywall was gone, this was all that remained.  Our house was built in 1933, so the construction of the walls is rather old.  It was rather thrilling to see everything removed and down to the bare bones of the shower.  We'd been talking and planning this renovation for almost a year and it was finally taking shape.

After the drywall was off, came the long process of measuring, cutting, and drilling the cement backerboard.  This is the only screw I believe I drilled during the whole process.  It really took a lot of pressure to get the screws in.  This task was left up to Kinsey and his father.  This essentially ended day 1 of the renovation.   

Day 2 involved beginning to tile.  We chose 12 x 12 inch tiles for the back main wall with a single row of 6 x 6 inch tiles about half way up.  The smaller two walls were 6 x 6 inch tiles the entire way.  This was our first attempt at tiling.  We went to a tiling workshop a few months ago at Home Depot and took diligent notes so we had a pretty good idea about the process.  The hardest part is setting the first row of tile to ensure everything is straight.  We mapped most of the tile out and tried our best to avoid unnecessary cuts.  Around this time, we also realized it might be handy to pick out our shower fixtures, which we failed to purchase yet.  We didn't want to cut holes around the plumbing that wasn't large enough.  So Kinsey and I headed off to Lowes, while Kinsey's mom mapped out the tile placement.

A few fixtures purchased and one special order placed and we were back to the shower.  Once we got the hang of laying the tile, the job went pretty fast.  We finished one wall.  And then another wall.  And finished about half of the last wall when we ran out of thin set adhesive.  So we took a break and headed back to Lowes for the second time that day.  


We managed to tile about 90% of the last remaining wall, and then our tile cutter broke.  And then it broke in a second place.  And then it broke beyond repair.  Granted, our cutter wasn't a very good one.  We bought it on clearance for under $15.  We later found out that porcelain is really hard to cut with this type of cutter.
Of course, every tile remaining needed to be cut.  So we checked the clock and returned to Lowes for the third time that day (30 minutes before they closed) to see our options.  We didn't really want to buy a new cutter.  The cheap ones aren't very good (especially for porcelain) and I really didn't see a need to spend $50 or $100 on a tile cutter we may or may not use again. 
 Lucky for us, the friendly guy in the tiling department told us that because we bought our tile there, they can cut our tiles for us!  For free! Not lucky for us, there was no way we could run home, measure the cuts that needed to be made, and return that night.  So we'd have to wait until the next day.  We were frustrated to have to wait to finish when we were so close, but were exhausted.

Day 3, began at Lowes (no surprise there) and we got the rest of our tile cut.  By the afternoon, our tile was all up and the only thing left to do was to wait.  The next step, grouting, couldn't be done until 24 hours after the tile was set.  

Part II coming tomorrow.....

Tuesday, March 15, 2011

New Pins!


I've been making a bunch of new pins lately.  Some are in the shop and some I'm holding back for spring craft shows. 

This one is a little ode to spring and the succulent:


I love these plants!  I'm so looking forward to getting some seeds and plants started in the next week or so.

Wednesday, March 9, 2011

bathroom renovation progress part I


This is what our bathroom looked like just 48 hours ago:


Yes, we finally started our bathroom renovation.  We knew since we moved in that we'd end up changing the bathroom.  We had one of those plastic shower surrounds which was okay, but it wasn't installed very good and seemed to be not firmly attached to the wall.  So we decided to put up some tile. The bath doesn't look anything like this currently, but it's still not ready to use.  However, it does look much, much better.  Shockingly better as Kinsey's parents reactions say.

Friday, March 4, 2011

new clutches!

I've been working on a lot of new clutches in the past couple days.  I'm really enjoying playing around with some new designs, especially with water and the sun.  Here's three of the newest ones in the shop


Setting Spring Sun by River Clutch


 The Creek in the Woods Spring Flowers Clutch

Snowy Spring Trees Clutch